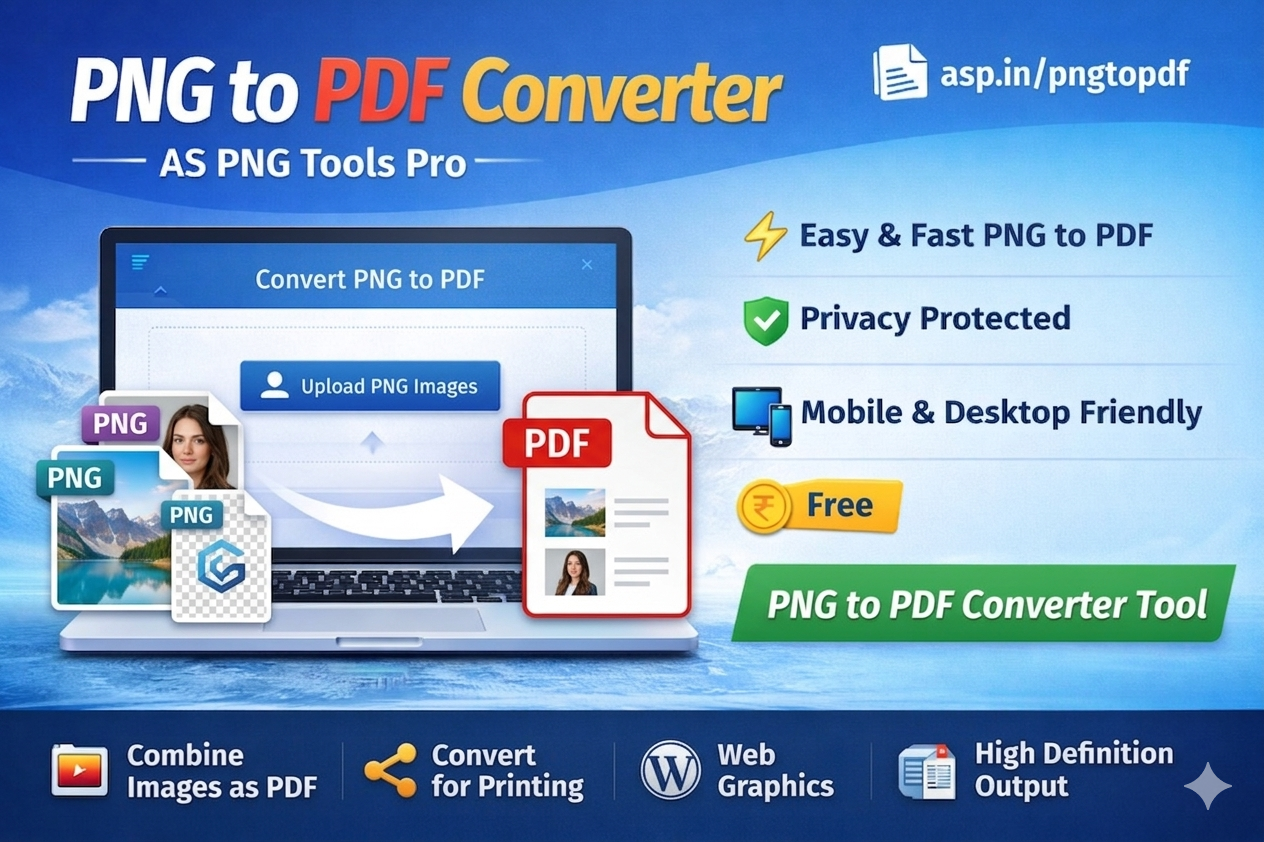
PNG to PDF Converter : In the modern digital landscape, the ability to seamlessly convert images to documents is not just a convenience—it’s a necessity. Whether you are a graphic designer sending a proof, a business professional submitting a report, a student compiling lecture notes, or a real estate agent creating a property portfolio, the need to transform PNG to PDF arises constantly.
PNG (Portable Network Graphics) files are the gold standard for images requiring transparency and high-quality detail. However, they are not always ideal for printing, sharing, or archiving. PDF (Portable Document Format) is the universal standard for documents—ensuring that your formatting remains intact across any device or operating system.
This comprehensive guide will walk you through everything you need to know about converting PNG to PDF. We will explore the “why,” the “how,” the best tools (both online and offline), advanced techniques like merging multiple images, security considerations, and troubleshooting common issues. By the end of this article, you will be an expert in handling image-to-PDF conversions, ensuring your files are always presentation-ready.
1. Understanding the Basics: PNG vs. PDF
Before diving into the conversion process, it’s crucial to understand what makes these two formats distinct.
What is a PNG?
PNG stands for Portable Network Graphics. It was developed as a patent-free alternative to GIF. Key characteristics include:
-
Lossless Compression: PNGs do not lose quality when compressed.
-
Transparency Support: They support alpha channels (transparent backgrounds), making them ideal for logos, overlays, and web graphics.
-
High Color Depth: They handle high-resolution images with millions of colors.
-
Best Use: Web graphics, screenshots, logos, and images requiring transparency.
What is a PDF?
PDF stands for Portable Document Format, developed by Adobe in the 1990s. Key characteristics include:
-
Fixed Layout: A PDF looks the same on any device, preserving fonts, images, and layout.
-
Multi-Page Support: Unlike a PNG, a PDF can contain hundreds of pages.
-
Vector Support: PDFs can contain vector graphics which scale infinitely without pixelation.
-
Best Use: Reports, e-books, forms, contracts, and print-ready materials.
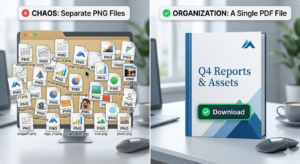
Why the conversion matters: A PNG file is a single image. If you have a multi-page document (like a contract or a photo album), sending individual PNG files is clunky. Converting them to a single PDF organizes your content into a professional, paginated document.
2. Why Convert PNG to PDF? The Key Benefits
Converting PNG images to PDF offers several distinct advantages that enhance productivity and professionalism.
A. Universal Compatibility
PDFs are universally accepted. While a PNG might fail to open on an older operating system or specific software, PDF readers (like Adobe Reader) are ubiquitous. If you are sending a resume, invoice, or legal document, a PDF ensures the recipient sees exactly what you intended.
B. File Compression
PNG files, especially high-resolution ones, can be massive. Converting to PDF often allows for significant compression without a noticeable loss in visual quality. This makes files easier to email or upload to portals with size limits.
C. Multi-Page Organization
This is the most significant benefit. A single PDF can represent an entire project. For example, a photographer can convert 50 wedding photos (PNGs) into one PDF slideshow for the client. An architect can combine 10 blueprint PNGs into one easily navigable document.
D. Security Features
PDFs allow for password protection, encryption, and digital signatures. You cannot password-protect a standalone PNG file. By converting sensitive PNGs to PDF, you can control who views, prints, or edits the document.
E. Professional Presentation
Submitting a series of loose image files looks unprofessional. A combined PDF presents a polished, cohesive document with proper pagination, making you look more organized and competent.
3. Method 1: The Quick Online Converter (Best for Speed & Convenience)
For 90% of users, an online converter is the best solution. They require no software installation, work on any device, and are incredibly fast. One of the industry leaders in this space is Smallpdf, which offers a streamlined, secure PNG to PDF conversion tool.
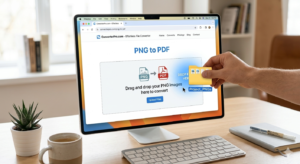
How to Use an Online PNG to PDF Converter (Step-by-Step)
-
Navigate to the Tool: Go to a trusted platform like Smallpdf’s PNG to PDF tool.
-
Upload Your Images: Drag and drop your PNG files directly into the designated area. Most tools allow you to select multiple files at once.
-
Arrange the Order: Once uploaded, you will see thumbnails of your images. Crucially, drag and drop these thumbnails to arrange the order of pages in your final PDF. Page 1 will be the first image in the list.
-
Adjust Settings (Optional):
-
Margins: Choose “No Margin” for edge-to-edge images or “Default Margin” for a white border (useful for printing).
-
Orientation: Select “Portrait” (vertical) or “Landscape” (horizontal). Most tools auto-detect based on image dimensions.
-
Page Size: Select standard sizes like Letter (US) or A4 (International).
-
-
Convert: Click “Convert” or “Create PDF.”
-
Download: The tool processes the file in the cloud. Once ready, download the PDF to your device.
Why Choose a Specific Tool?
The reference tool (Smallpdf) excels because it combines speed with privacy. It uses TLS encryption for file transfers and automatically deletes files from its servers after one hour, ensuring your data isn’t left lingering online.
4. Method 2: Using Adobe Acrobat (Best for Professionals)
If you require high-end features like optical character recognition (OCR), advanced compression, or batch processing, Adobe Acrobat Pro (paid) is the industry standard.

Steps in Adobe Acrobat Pro:
-
Open Acrobat: Launch Adobe Acrobat Pro.
-
Create PDF: Go to Tools > Create PDF.
-
Select Files: Click “Single File” or “Multiple Files.” Select your PNG images.
-
Combine: If combining multiple, Acrobat will open a “Combine Files” interface where you can reorder, delete, or add more files.
-
Optimize: Before saving, you can use the “Optimize Scanned Pages” or “Compress PDF” options to manage file size.
-
Save: Click “Combine” and save the final PDF to your hard drive.
Advantages of Desktop Software:
-
No Internet Required: Works offline.
-
Batch Processing: Convert thousands of images at once.
-
OCR: If your PNG contains text (like a scanned document), Acrobat can make that text searchable and editable.
5. Method 3: Built-in Operating System Tools (Best for Free & Quick)
Did you know you don’t need to download anything extra? Both Windows and macOS have native tools to convert PNG to PDF instantly.
For Windows Users: The “Print to PDF” Method
Windows 10 and 11 come with a built-in “Microsoft Print to PDF” feature.
-
Open the folder containing your PNG files.
-
Select the PNG(s) you want to convert. (To combine multiple, select them all).
-
Right-click and select Print.
-
In the print dialog, under Printer, select Microsoft Print to PDF.
-
Adjust settings: Choose Page Size (Letter/A4) and Quality.
-
Click Print. It will prompt you to save a new PDF file.
Note: This method treats the images as a print job. For multiple images, you must select “Fit picture to frame” to avoid cropping.
For Mac Users: The Preview App Method
macOS has the excellent Preview app.
-
Open all the PNG files you want to convert in Preview. If combining, select all files in Finder, right-click, and choose Open with Preview.
-
In Preview’s sidebar, ensure the thumbnail view is visible.
-
Drag the thumbnails to arrange them in the correct order.
-
Go to File > Export as PDF…
-
Choose the name and location, and click Save.
6. Method 4: Mobile Solutions (iOS and Android)
In a mobile-first world, you often need to convert files directly from your phone.

For iOS (iPhone/iPad)
Apple’s Files and Print function works seamlessly.
-
Open the Photos app and select the PNG(s).
-
Tap the Share button (square with arrow).
-
Swipe down and tap Print.
-
In the print preview, use a pinch-out gesture (zoom out) on the thumbnail. This opens the PDF view.
-
Tap the Share button again and select Save to Files.
For Android
Most Android devices have a “Print” function similar to Windows.
-
Open the Gallery or Google Photos.
-
Select the PNGs and tap Share.
-
Choose Print.
-
In the printer selection, choose Save as PDF.
-
Tap the PDF icon to save it to your device.
Alternatively, apps like Adobe Scan or CamScanner allow you to capture images and instantly convert them to PDF with automatic edge detection and enhancement.
7. How to Combine Multiple PNGs into One PDF
This is perhaps the most requested feature. You rarely convert just one PNG; you usually have a series of images that belong together. Here is how to master the merge.
The Challenge:
If you simply drag 10 PNG files into an online tool without checking settings, you might end up with 10 separate PDF files, or one PDF where the images are misaligned or the order is wrong.
The Solution: Using a Dedicated Merger
When using tools like Smallpdf or ILovePDF, look for the “Merge” or “Combine” function specifically, or ensure the PNG to PDF tool allows multi-select uploads.
Step-by-Step for Perfect Merging:
-
Upload All: Upload every PNG you need.
-
Ordering: Most tools allow you to drag and drop thumbnails. Name your files sequentially (e.g., “Page_01”, “Page_02”) before uploading to make ordering easier.
-
Uniform Settings: Ensure all pages share the same page size and orientation. If you mix portrait and landscape photos, the tool will usually adjust page-by-page.
-
Margin Control: If you are combining screenshots for a report, “No Margin” looks best. If you are combining photos for a physical album, “Small Margin” prevents the printer from cropping the edges.
8. Advanced Settings: Margins, Orientation, and Size
To achieve a professional result, you must understand the settings available in advanced converters.
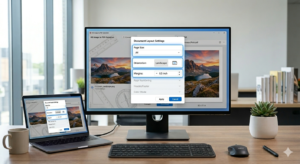
Page Size (Letter vs. A4)
-
Letter (8.5 x 11 inches): Standard in North America.
-
A4 (210 x 297 mm): Standard internationally.
-
Fit to Page: Ensures the entire PNG image is visible on the page without being cropped. If your PNG has a different aspect ratio than the page size, “Fit to Page” will add white bars (letterboxing) to maintain the image proportions.
Orientation
-
Portrait: Taller than wide. Best for documents, letters, and mobile screenshots.
-
Landscape: Wider than tall. Best for wide photos, presentations, and spreadsheets.
-
Auto-detect: Many tools automatically detect orientation based on the image dimensions.
Margins
-
No Margin (Full Bleed): The image touches the edges of the PDF. Ideal for digital viewing or professional printing where the image is meant to be edge-to-edge.
-
Small/Medium Margins: Adds a white border. This is useful for:
-
Printing: Ensures no content is cut off by the printer’s physical limitations.
-
Binding: If you plan to staple or bind the document, margins prevent text from being lost in the spine.
-
Annotations: Allows space for handwritten notes.
-
Compression Quality
When converting, some tools ask for Quality Settings.
-
High Quality (Lossless): Large file size. Best for archival or printing.
-
Medium Quality: Balances visual fidelity and file size. Best for email attachments.
-
Low Quality: Small file size. Best for web uploads where file size limits are strict.
9. Security and Privacy: What Happens to Your Files?
When using online converters, security is a top concern, especially if you are handling sensitive documents like contracts, medical records, or personal IDs.
The Risks of Free Tools
Many free, obscure online converters have questionable privacy policies. They may:
-
Store your files indefinitely.
-
Use your files for data mining.
-
Lack encryption, leaving your files vulnerable during transfer.
How to Choose a Secure Converter
Look for the following indicators:
-
TLS Encryption: The URL should start with
https://. This ensures your file transfer is encrypted. -
Automatic Deletion: Reputable tools (like Smallpdf) automatically delete files from their servers after a set period (often 1 to 24 hours).
-
Privacy Policy: A clear, transparent privacy policy stating they do not retain files or share data with third parties.
-
No Sign-up Required: If a tool forces you to create an account for a simple conversion, your data is likely being collected for marketing purposes.
Recommendations:
-
For Personal Use: Secure online tools are fine.
-
For Business/Confidential: Use desktop software (Adobe Acrobat) or an encrypted enterprise solution to ensure data never leaves your network.
10. Troubleshooting Common PNG to PDF Errors
Even with simple tools, issues can arise. Here’s how to fix them.
Problem 1: The PDF is Blurry or Pixelated
Cause: The PNG was compressed too aggressively, or the PDF reader is scaling the image down.
Solution:
-
Ensure you select “High Quality” or “Original Size” in the converter settings.
-
Check the DPI (Dots Per Inch) . For print, aim for 300 DPI. For web, 72-150 DPI is fine.
-
Avoid converting a small PNG (e.g., 500×500 pixels) to a large page size (e.g., A4). It will pixelate. Upscale the image before conversion.
Problem 2: The PDF File is Too Large
Cause: PNGs are lossless and often large. Converting to PDF does not always compress them automatically.
Solution:
-
Use a “Compress PDF” tool after conversion.
-
In the settings, look for a slider for “Quality/Size” and move it toward “Smaller File Size.”
-
If using Adobe Acrobat, use the “Save As Other” > “Reduced Size PDF” option.
Problem 3: Images are Cut Off or Cropped
Cause: The page size is smaller than the image, or the margin settings are incorrect.
Solution:
-
Choose “Fit to Page” or “Auto-resize” .
-
Manually adjust the page size to match the image dimensions, or select “Custom Page Size” if available.
-
Check the orientation. If you uploaded a landscape photo but selected portrait orientation, it will crop the sides.
Problem 4: Transparency Becomes Black or White
Cause: PNGs have a transparent background. PDF viewers often render transparency as white or, in rare cases, black if the rendering engine fails.
Solution:
-
Ensure the converter supports transparency retention. Most modern converters (Smallpdf, Adobe) will keep the transparency, but when you view it in a PDF reader, it will appear white unless placed over a colored background in a design tool.
-
If you need the background to remain invisible for printing (e.g., a logo), you must use professional software like Adobe Illustrator or InDesign to maintain the alpha channel.
11. Compressing PDFs After Conversion
Once you have your shiny new PDF, you might find it’s still too large to email (most email servers cap at 25MB). Post-conversion compression is essential.
Top Tools for PDF Compression:
-
Smallpdf Compress PDF: Offers “Lossless” compression (no quality loss) and “Extreme” compression (smallest size).
-
ILovePDF: Similar to Smallpdf, allows batch compression.
-
Adobe Acrobat: “Optimize PDF” tool allows granular control over image resolution, font embedding, and discarding unused objects.
Tips for Compression:
-
Images are the culprit: In a PDF, images take up 90% of the file size. Reducing the resolution of images from 300 DPI to 150 DPI can shrink the file size by 75% while still looking fine on a monitor.
-
Remove metadata: Strip out EXIF data (camera info, GPS) from images to save a few kilobytes.
-
Compress after merging: Don’t compress each PNG individually. Merge them into one PDF first, then compress the single file for the best ratio.
12. Best Practices for High-Quality Output
To ensure your converted PDF looks exactly as intended, follow these professional best practices.
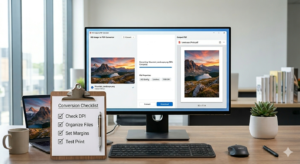
1. Organize Your Files First
Before uploading, rename your PNG files numerically (01_cover.png, 02_intro.png). This prevents the converter from mis-ordering them alphabetically in a way you didn’t expect.
2. Check Aspect Ratios
If you are mixing portrait and landscape images, decide if you want the PDF pages to rotate automatically. Some tools allow you to “Auto-rotate” pages to match the image orientation, which is preferable for viewing on a tablet.
3. Use Vector Overlays (If Possible)
If you are creating a professional document (like a brochure), consider using a PDF editor to add text boxes over the images. This creates a layered PDF that is searchable and professional without altering the underlying PNGs.
4. Test Print One Page
If the final output is for physical printing, print one page first. Check for:
-
Color Accuracy: RGB vs. CMYK. PNGs are RGB (for screens). Printers use CMYK. There might be a color shift. Professional converters handle this, but it’s worth checking.
-
Bleed: If the image goes to the edge (no margin), ensure your printer supports “borderless printing.”
13. Conclusion
Converting PNG to PDF is a fundamental digital skill that bridges the gap between high-quality imagery and professional document sharing. Whether you opt for the speed and simplicity of an online tool like Smallpdf, the robust features of Adobe Acrobat, or the built-in capabilities of Windows or Mac, the key is understanding your output goals.
By following the steps outlined in this guide—choosing the right method, adjusting margins and orientation, merging multiple files correctly, and ensuring data security—you can consistently produce clean, efficient, and visually stunning PDFs. Remember, the goal is not just to change a file extension, but to enhance the presentation and accessibility of your content.

14. Frequently Asked Questions (FAQ)
Q1: Does converting PNG to PDF lose quality?
A: No, if done correctly. Using lossless conversion settings (which most reputable tools use) will preserve the original quality of the PNG. However, if you compress the resulting PDF aggressively, you may lose quality.
Q2: How can I convert multiple PNGs to one PDF?
A: Upload all your PNG files simultaneously into a tool like Smallpdf or Adobe Acrobat. Ensure the “Combine into one PDF” option is selected, then arrange the pages in order before downloading.
Q3: Is it safe to convert sensitive PNGs online?
A: It depends on the tool. Use services that offer TLS encryption and automatic file deletion. For highly sensitive documents (e.g., tax forms, legal contracts), it is safer to use offline desktop software like Adobe Acrobat Pro.
Q4: Can I convert PNG to PDF on my iPhone?
A: Yes. Open the PNG in the Photos app, tap Share, tap Print, then use the pinch-out gesture on the preview to convert it to a PDF, and save it to Files.
Q5: Why does my PDF have a black background instead of transparent?
A: PDF viewers often display transparent backgrounds as white. If you are seeing black, it may be a rendering glitch in the viewer. Try opening the PDF in Adobe Acrobat Reader or a different browser. If the transparency is critical (for a logo), ensure your converter explicitly supports alpha channels.
Q6: What is the difference between converting PNG to PDF and JPG to PDF?
A: PNG supports transparency, while JPG does not. If you need a transparent background in your PDF (e.g., for a logo overlay), you must start with a PNG. Otherwise, JPG files are usually smaller and fine for photographs.